The word prim is a shortened version of "primitive" and refers to the 3D polygonal shapes used by residents to build objects in Second Life. Commonly used primitive shapes are cubes, spheres, and cylinders which can all be "linked" together to form more complex objects. Other types of prims are prisms, tori, rings, and tubes. Prims can be edited in a multitude of ways (parameters/properties): scale, cut, hollow, twist, dimple, shear, skew, revolve, radius delta, set physical, made flexible and/or a light, and more.
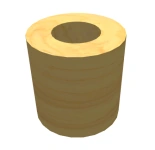
| Box | Prism | Sphere | Cylinder |
|---|---|---|---|
|
|
|
|
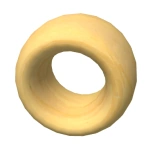
| Torus | Tube | Ring | |
|
|

|
A single prim is also an object type of item and will be represented as such in a resident's inventory (being placed in the "Objects" folder with an object icon) but, typically elsewhere in SL's UI, an object refers to a full linked set of prims.
Back in the early beta period of SL, there was a prim type called a "spiral" (which may have looked similar to the cork-screw shape that can be made with rings) that was removed due to its impact on the physics engine. Tubes were also removed for a period of time.
Shorthand for primitive, prims form the basis for the look and feel of second life. These are basic 3-D shapes that provide the basis for all other shapes, and are then texturized to provide a more realistic appearance of reality.
States of Being[]
- Locked - prevents object from being accidentally moved or deleted
- Physical - Causes object to obey the laws of gravity. Also allows the object to be pushed around
- Temporary - Temporary objects disappear after a minute.
- Phantom - Able to be walked through, and physics does not effect (Floats wherever you place it)
Ordinary Prims[]
Ordinary prims are created using the editor, as opposed to huge prims which can only be made by copying an existing huge prim.
Common Features[]
The main thing that these shapes have in common, is a size limitation of 10 meters. Additionally, they operate within an XYZ coordinate system for purposes of measurement and location.
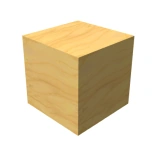
Box[]
The size limitation not withstanding, boxes are readily extended by attaching attaching additional boxes at the edges. In addition, to being able to change their shape by changing their dimensions, one can also alter their angles using the taper and shear options. Other Options:
- Hollowing - Using this option you can hollow out the box along the Z axis.
- Cutting - Using this option, you can cut part of the box out along the Z axis.
- Tapering - This can be done along either the X or Y axes. Useful for converting boxes into trapezoids. Unfortunately tapering is not available along the Z axis.
- Shearing - Can be done only along the X or Y axes. The result will some kind of parallelogram.
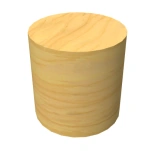
Cylinder[]
A tube, with no hole. 2 round faces, and an outside face. Can be stretched to long and thin/ovular shapes. The Z axis runs through the cylinder from one end to the other, and determines where the hollowing and cutting operations will occur. Properly twisted, cylinders can be made into spiral ramps.
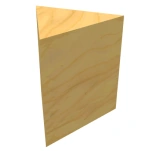
Prism[]
More correctly referred to as a tetrahedron, it is nothing more than a fully tapered box.
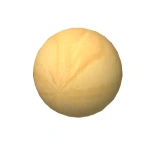
Sphere[]
A round object with only one, wrapping face. While it can be cut and hollowed, there is not much else of functional use, unless you are into art.
Torus[]
A rounded donut with only one face unless you change the Path options. This is your friend for natural-looking objects. Can be used to make rocks, water, waterfalls, most natural shapes benefit from a variation of a torus somehow
A torus is composed of 1024 vertices.
Tube[]
A cylinder with a hole through the center. Both cylinder and hole are scalable, useful to pools and other man-made objects.
Ring[]
Sculpted[]
Sculpted prims rely on an uploaded heightmap image for their shape, and can therefore not be modified via menu, other than changing the height map texture to a different one. SL heightmaps are 32x32, larger sizes are compressed. Note that 32x32 pixels means that sculpted prims are limited to 1024 vertices for any given size. full article sculpted prim
Adding Texture[]
To add texture, select the prim you want to texture, then select the "More" dropdown menu option, and then the "Texture" tab. You can select the textures by clicking on the texture preview, and navigating to it within your inventory. To tint a texture, click the tint preview and select a color and intensity for it. To move a texture to its proper place on the prim, use the X and Y offsets till it is right. If the texture is repeating too much, or stretched too far, use the repeat Horizontal and Vertical to decide that. To add/edit a texture on only one face, select the "Select Texture" option, select the face, and edit. TO make an object transparent, use the 'transparent' field to the right of the texture and tint previews.
Maneuvering the Pieces[]
Moving[]
The forms that you create can be maneuvered in one of two ways. Moving and rotating. The easiest to start doing so, is to click on the object, and select edit. At that point you should see three arrows reflecting the X,Y, and Z axes. By selecting the arrow for the axis that you want and holding onto it, you can move the object from one location to another. Alternatively, if you want to be more precise about, take a look at the Prim edit screen and enter the coordinates in directly. One warning, don't enter a Z value of 200 or more. The object will reappear 200 meter or more up in the air, and you will have a devil of a time getting at it.
Rotating[]
Rotating: Same thing as with moving, except that while in edit mode, you will want to hold down the Control key. Holding down the Control key gets you a tri-color globe, with each color ring representing an axis that can be used to turn the object around.
Creating Multi-Prim Objects[]
To create multi-prim objects, arrange two or more prims how you want them connected (preferably with all needed alterations already made) and select one. Hold shift and click on the other(s), then press CTRL+L. This will link the objects together, and they will stay in their relative positions. To change positions/parameters of objects individually while linked, select "Edit linked objects", and select the one you want to edit. This is how you will make almost everything useful or sellable within SL.